Feasycom Warehouse Management KIT Get Started
Feasycom Warehouse Management KIT
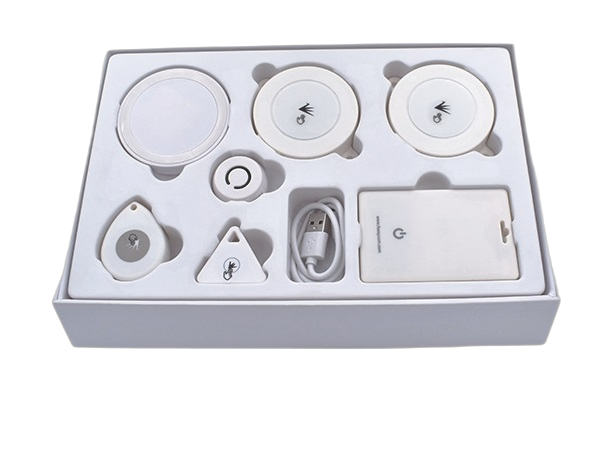
Plist:
FSC-BP201 |
1pcs |
Bluetooth & Wi-Fi(2.4G&5G) Gateway |
FSC-BP120 |
1pcs |
Temperature and humidity sensor |
FSC-BP105N |
2pcs |
Ultra-thin wearable card |
FSC-BP103B |
2pcs |
mini keychain tag |
FSC-BP108 |
2pcs |
Positioning tag |
FSC-BP104D |
2pcs |
Waterproof Beacon |
other |
1pcs |
USB power cable |
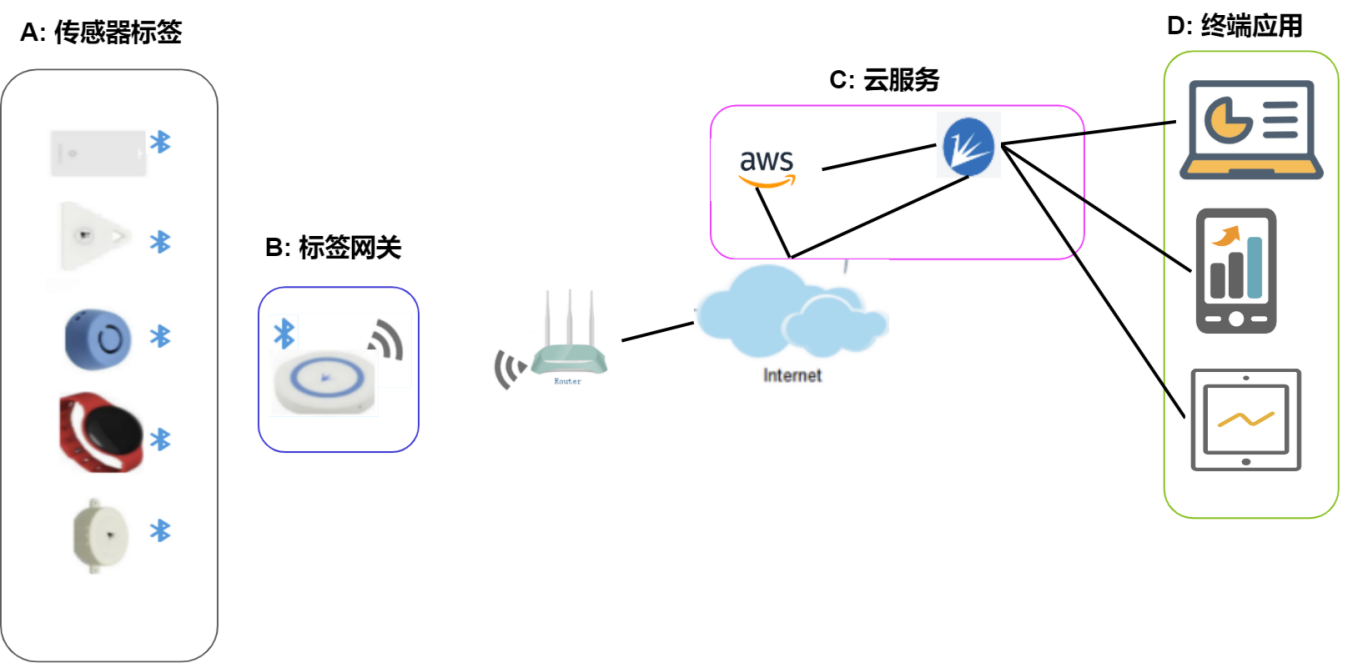
Application
FeasyCloud Login
The following explanation is based on Windows 10 and Chrom browser version 119 as an example:

Use the email address you registered when purchasing to log in to the FeasyCloud website. The access address is as follows:
Users within China, access URL: https://feasycloud.com.cn
Users outside China, access URL: https://feasycloud.com
If so, you will receive an activation email in your mailbox. Please find the notification email in your mailbox and click on the link in the notification. When entering for the first time, you need to create a customized login password.
If not, please consult your sales or send an email to sales@feasycom.com. We will contact you as soon as possible after receiving your email.
After you log in successfully, you will enter the Home page.
Import the gateway to the cloud
The following explanation is based on Windows 10 and Chrom browser version 119 as an example:
First, you must add the device token of your gateway FSC-BP201 to the cloud.
This must be done immediately, otherwise subsequent operations will be unsuccessful and your debugging work and use will not proceed normally.
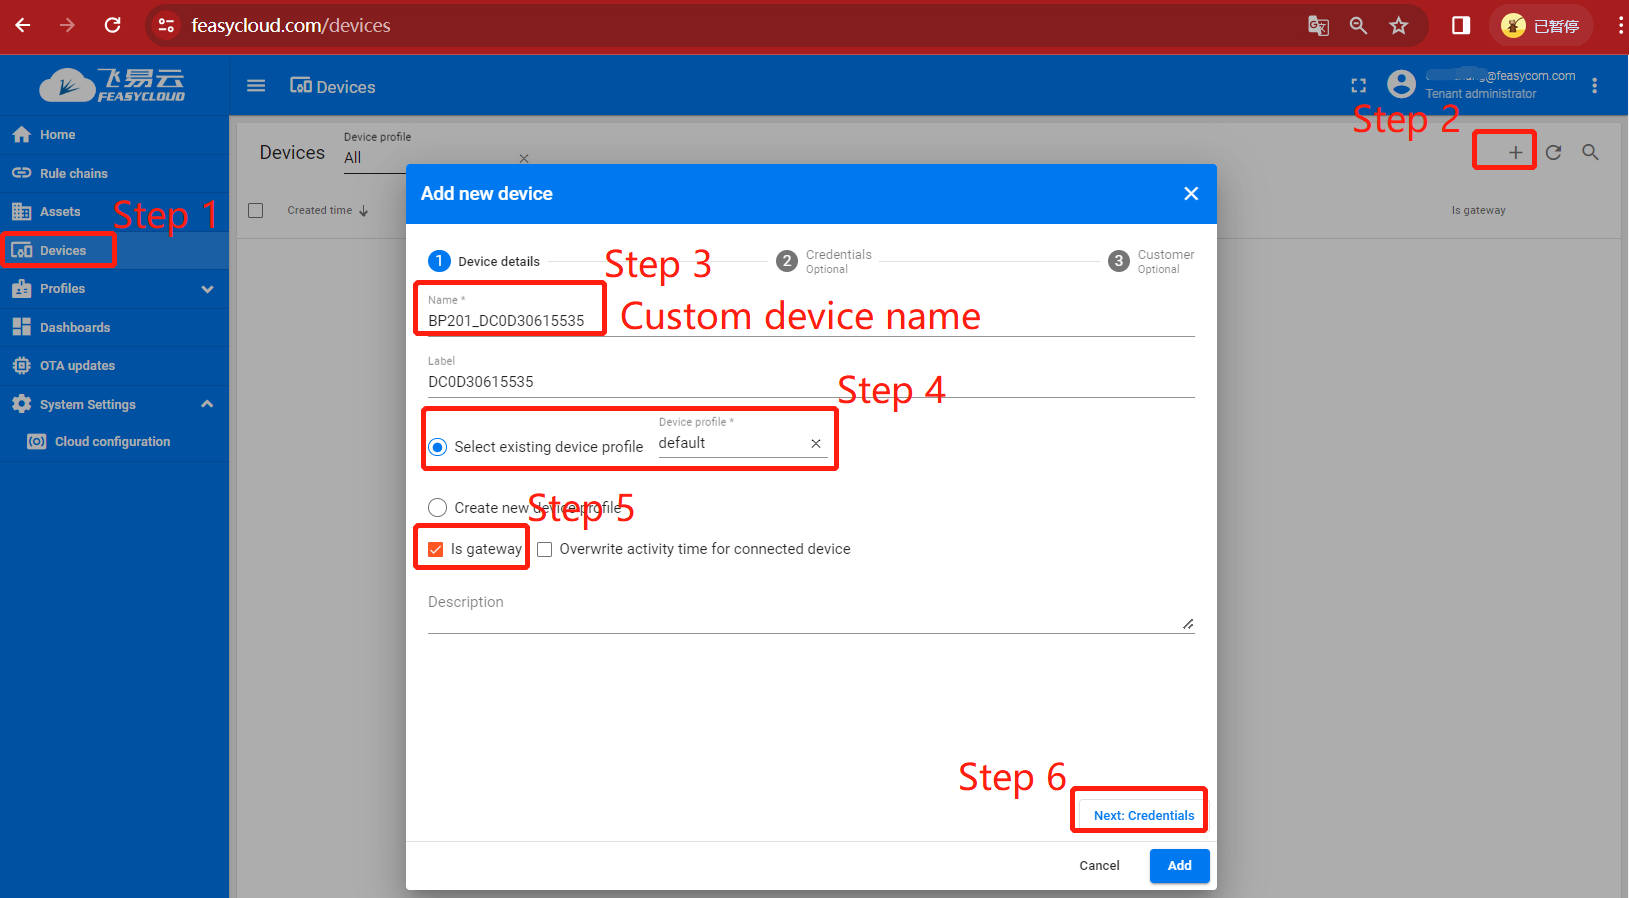
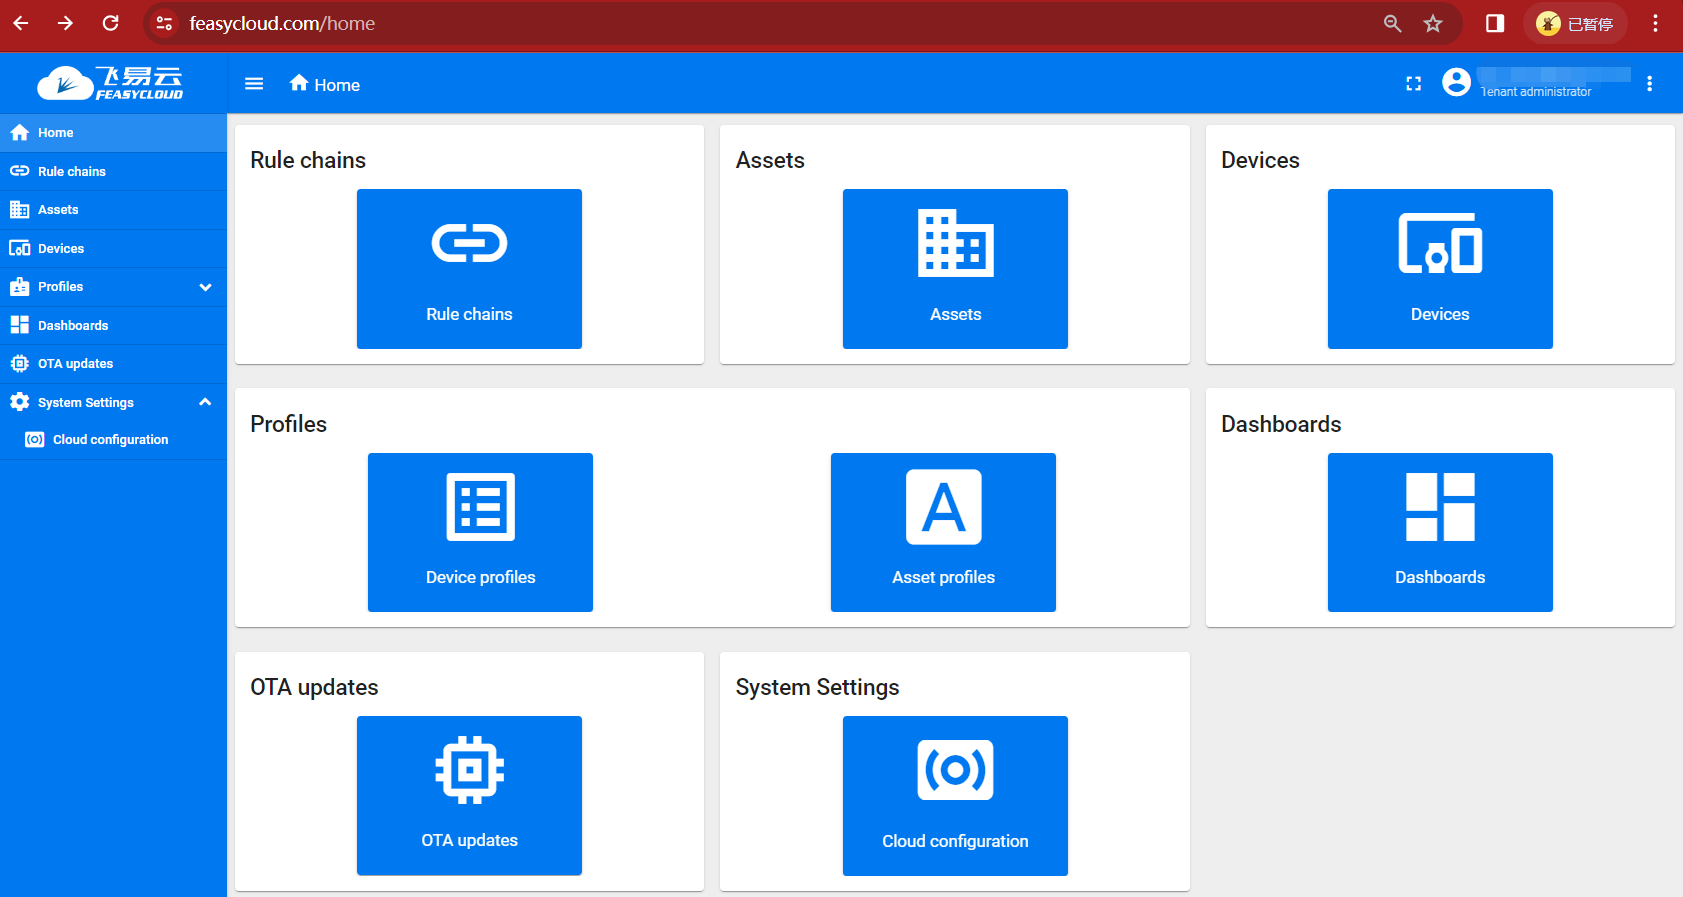
Step 1. In FeasyCloud-Home, please enter the device management page through “Devices” in the left navigation menu;
Step 2. Click “+” on the right to enter Add new Device;
Step 3. Customize the device name label for your gateway FSC-BP201;
We recommend that the naming format refer to the illustrated format, and please ensure that the string after the underscore in the device name corresponds to the MAC address of the device;
Step 4. Device profile configuration “default” is enough;
Step 5. Select “Is gateway”: “√”;
Step 6. Click “Next Credentials” to proceed to the next step;
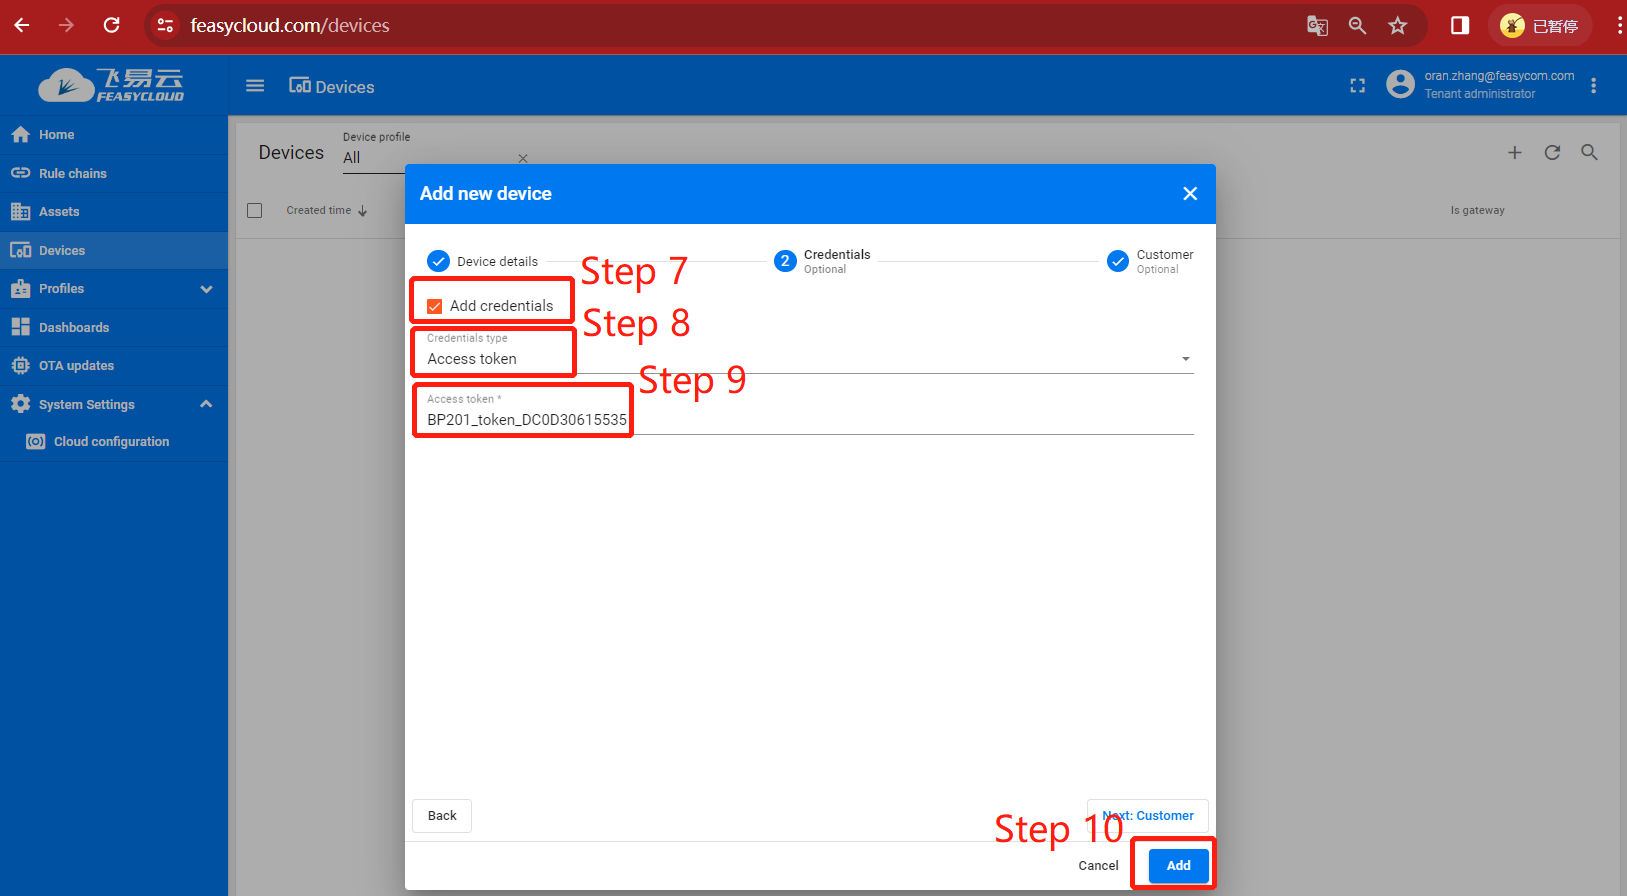
Step 7. Select “Add credentials” : “√”
Step 8. “Credentials type” is selected as: Access token”
Step 9. “Access token” Enter the Token of the device
The TOKEN added to the cloud platform must be consistent with the TOKEN built into the device, otherwise subsequent operations will not be possible
For the token built into the device, please check the token information about the device in the list that comes with the sample machine;
Or send the AT command AT+TOKEN through the serial port to read the TOKEN information built into the current device;
Step 10. After confirming that the entered information is correct, click “Add” in the lower right corner to add
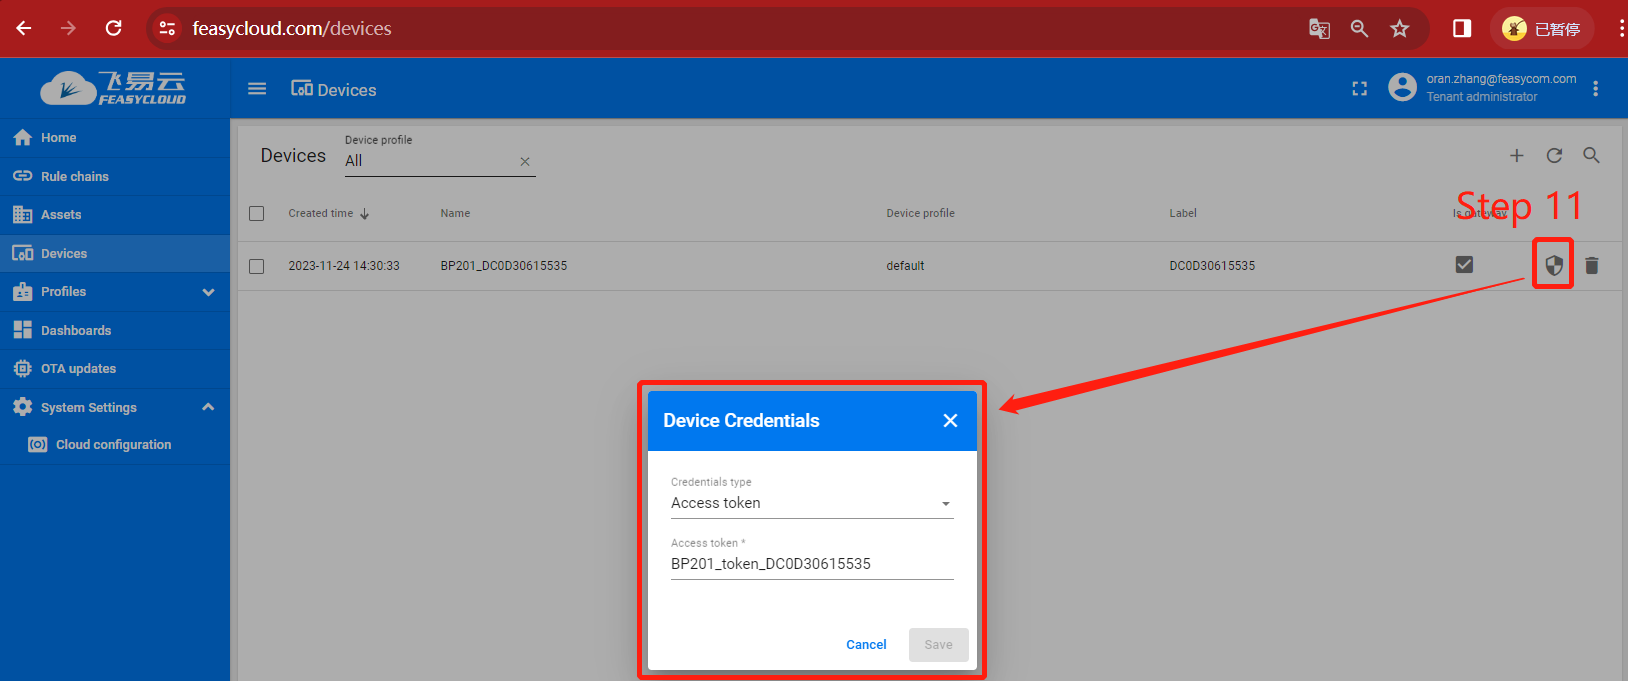
Step 11. After the addition is successful, your added gateway device will be displayed in the Devices device list. Click the “Token” icon corresponding to the device to view the TOKEN information of the device.
Gateway Distribution Network
The following explanation is based on Windows 10 and Chrom browser version 119 as an example:
FeasyCloud provides network distribution functions.
FSC-BP201 needs to be connected to the Internet, please use the SSID information and corresponding password of the WiFi AP that can be connected to the Internet to connect the gateway device to the network.
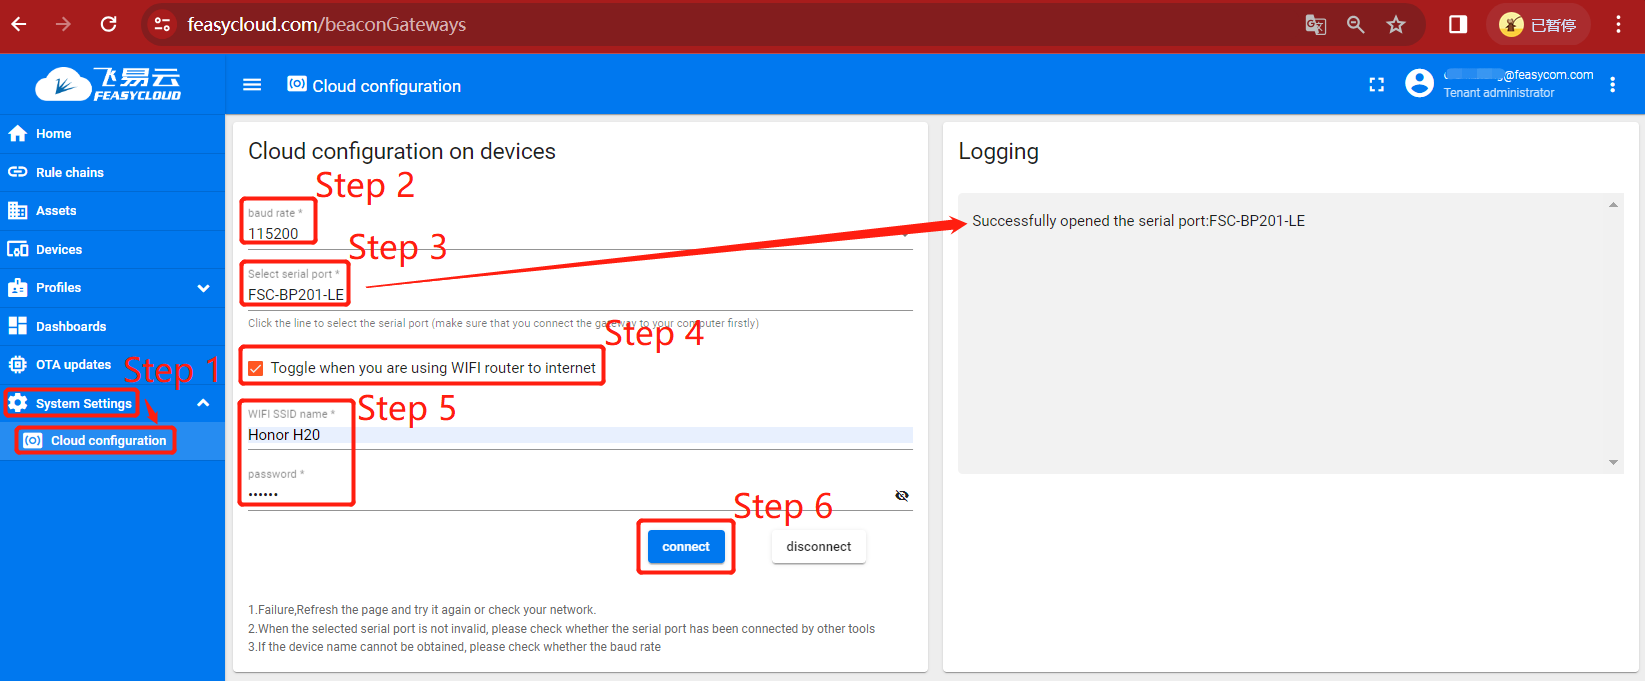
Step 1. In FeasyCloud-Home, please enter the configuration page through “system setting” - “Cloud configuration” in the left navigation menu;
Step 2. In the cloud configuration page, click “Baud Rate” . The default for general gateway programs is 115200;
Step 3.1 Connect your FSC-BP201 to your computer through the USB cable. At this time, the working indicator light of FSC-BP201 will light green, and a serial port device will be added to your computer system. Assume that the serial port is COM2;
Step 3.2 In the cloud configuration page, click “Select Serial Port” , and in the pop-up device list, select the device to be connected to the serial port COM2;
After the addition and connection are successful, the Logging window on the right side of the cloud platform will prompt “Successfully opened the serial port:FSC-BP201-LE”, which means the device is connected successfully;
Step 4 Select “Toggle when you are using WIFI router to internet”: “√”;
Step 5. Enter the contents of the WiFi SSID name and Password fields of your WiFi AP that can connect to the Internet;
Step 6. Click connect, your gateway device FSC-BP201 will enter the network automatically, and the cloud device will be added automatically.
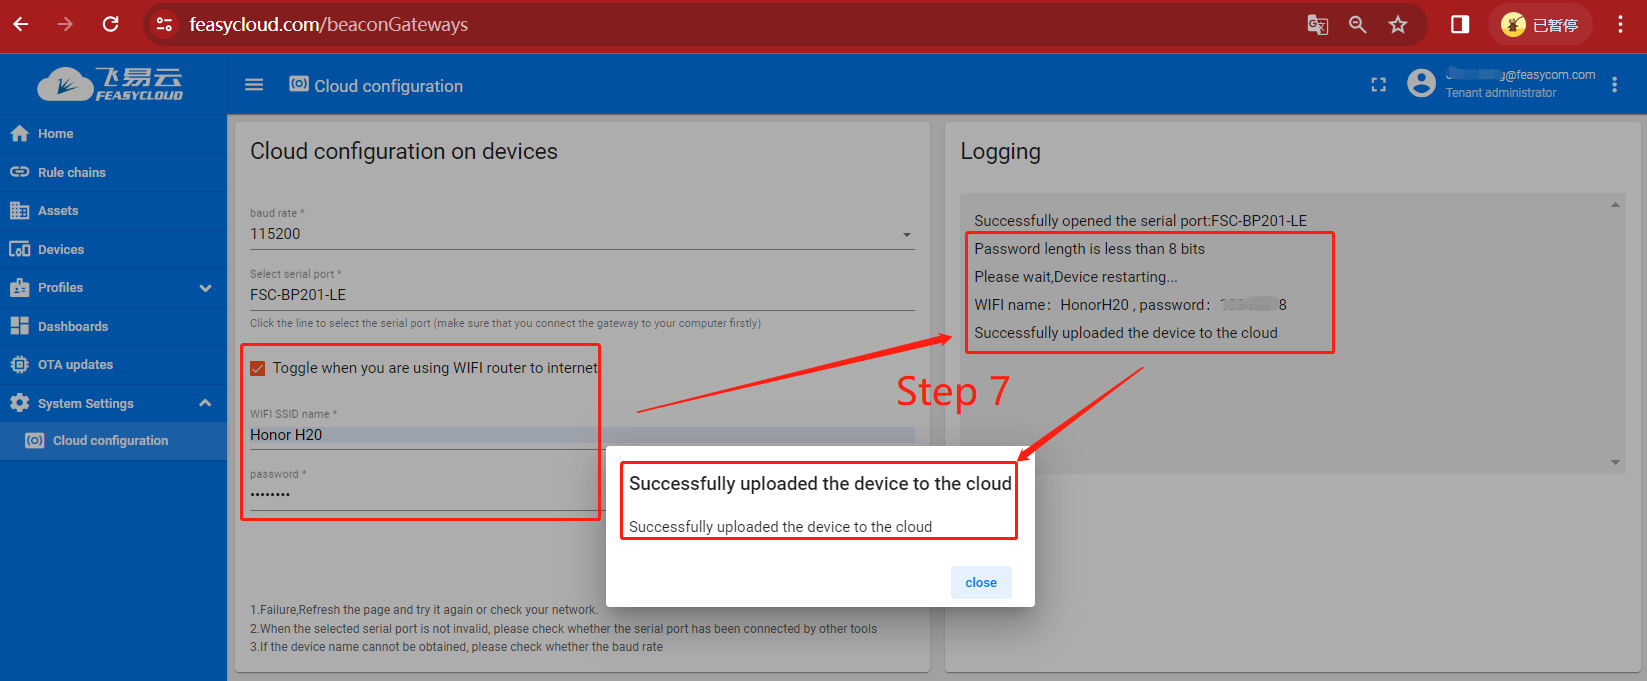
Step 7. On the right side of the cloud platform, the Logging window displays the progress of network access and the progress of adding gateway devices to the cloud.
If the addition is successful, a pop-up window will appear on the page showing “Successfully uploaded the device to the cloud”;
If there is an exception, please check the pop-up error message on the page, or troubleshoot based on the logging information on the right side of the page.
Check Beacon parameters
The following explanation is based on Windows 10 and Chrom browser version 119 as an example:
After completing the above network configuration work, make sure that the power of your Beacon device is turned on. As long as the gateway can recognize the Beacon device and is within the range, it will be scanned.
Please check whether Beacon has uploaded telemetry data. In the Beacon details telemetry tab, check the data update time.
If there is no update, please check more Beacons;
Example:
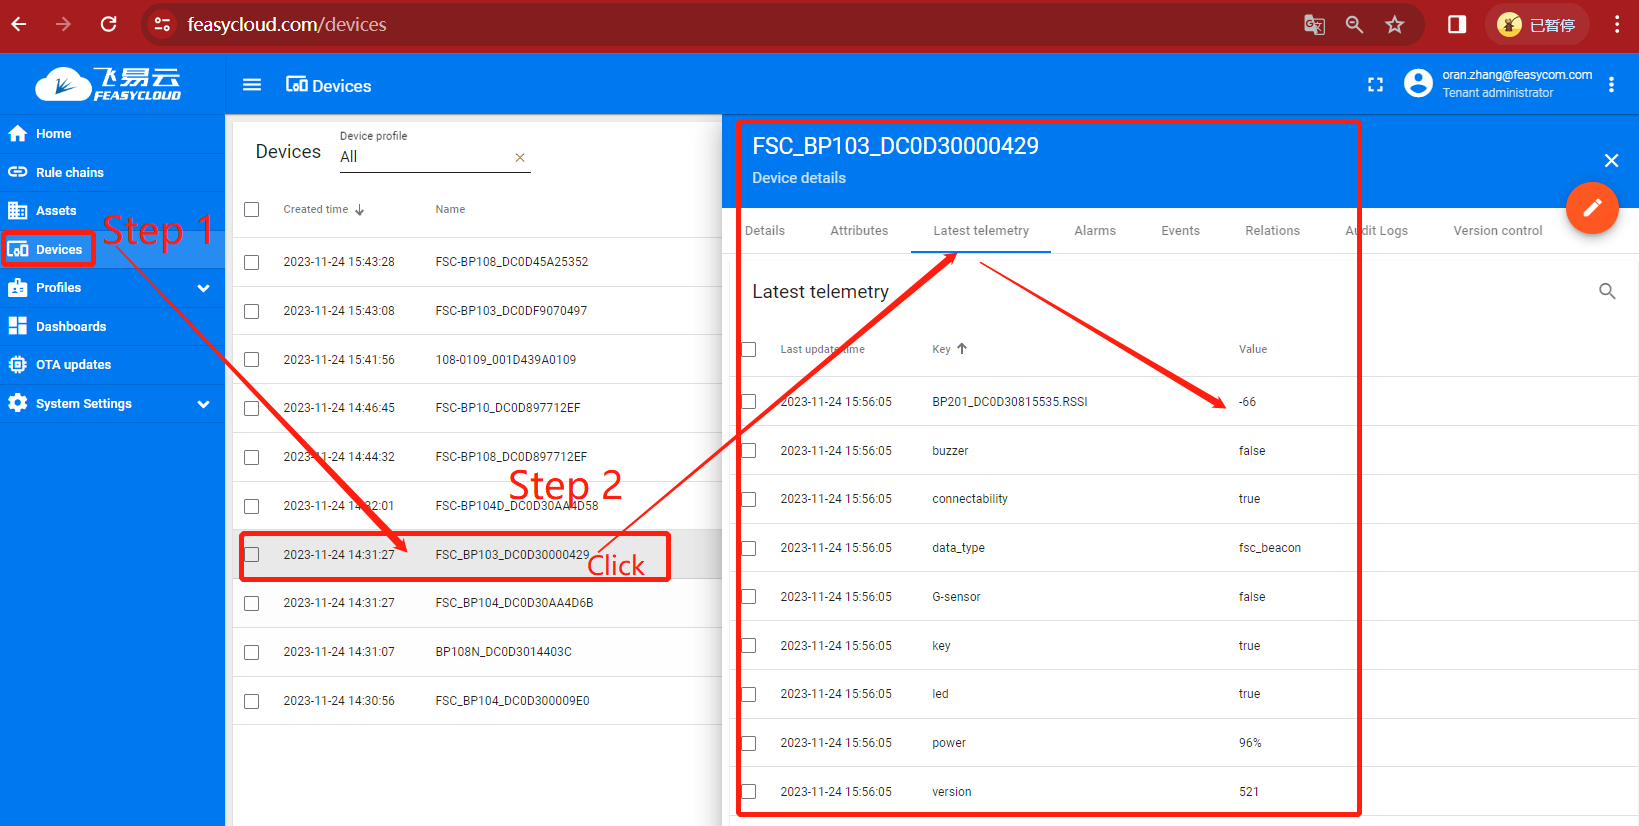
Step 1. “FeasyCloud”-“Home”, please enter the device management page through Devices in the left navigation menu;
Step 2. Device list, showing the devices recognized by the gateway Bluetooth. Click on any of the devices to view data information broadcast by the device;
Step 2. For example, click on one of the FSC_BP103_XXXX devices (where XXX represents the MAC address of the device), the detailed information box of the device will appear, select latest telemetry , you will see teleportation data similar to the one shown above, and the data will be updated intermittently.
Data interpretation
About latest telemetry
Different devices may have different telemetry data due to different functions.
For example: FSC-BP120 contains temperature and humidity telemetry data, but FSC-BP104 does not.
However, the devices in our suite mainly focus on Bluetooth tags. They all have a common telemetry data item that needs attention:
Received Signal Strength Indicator (RSSI) value in dBm, which reflects the signal strength received by the BEACON device;
For example:
Under the Latest telemetry Data page of the device FSC_BP103_XXXX, there is a key named BP201_DC0D5000F0001.RSSI, with a value of -64
This key name is divided into two parts:
The part before the decimal point: represents the gateway; (BP201_DC0D30815535) reports the RSSI value of this BEACON device (FSC_BP103_DC0D30000429);
The part after the decimal point: represents fixed characters; indicates that this key value is an RSSI value;
-66 means -66dBm, indicating that the BP201 gateway detects that the RSSI value of this Beacon device BP120 is -66dBm.
Other
—Asset management & indoor positioning applications, to be updated later, to be updated later
Appendix
Download PDF Document